Thursday, November 22, 2012

gluten-free thanksgiving feast

Look, I don't like turkey. I know, it's un-'Murrican, it's the whole point of Thanksgiving dinner, blah blah. Judge me how you want, I don't care. I don't like turkey, and I don't eat it unless I have to. Since I was hosting Thanksgiving this year, I didn't HAVE to make turkey...so I didn't. I made a pork rib roast instead, rubbed with sage and garlic. It was epic, visually stunning, and REALLY damn tasty:

sage and garlic rubbed pork rib roast
My only (trivial) complaint was that it was somewhat hard to carve even with the rib bones pre-cut by the butcher, but it was so juicy and flavorful that it kind of cancelled out all the flailing around with the knife that I had to do to get it onto the plates.

Unfortunately, most of the rest of my pictures of the feast came out really blurry (apparently a combination of low light and quaking with anticipation is not conducive to good photography), but I can still regale you with descriptions of what I made!

With the pork roast, I served my much-asked-for-in-my-family roasted veggie mix, which consists of carrot, potato, radish, and Brussels sprouts. I tossed the prepped veggies with sea salt and black pepper and some fresh thyme and rosemary, then spread them evenly over two parchment-lined baking sheets. I cooked them for about 20 minutes at 475 degrees (because that's what my roast was cooking at, at the time) and then another 20 minutes or so at 350 degrees. Cooking them at high heat first gives the surface a nice crisp crust, then cooking them at a lower heat for longer allows them to cook through without losing the crust or getting burnt.

For other sides, I made a wild and brown rice dressing with lots of fresh thyme, dried cranberries and chopped pecans, some whole-berry cranberry sauce made with maple syrup and orange zest, kale sauteed with shallots and bacon, and I also did a twice-baked winter squash. For the squash, I used buttercup squash which I hadn't used before. I cut it in half and cleaned the seeds out, then cooked it on a foil-lined baking sheet at 375 for about an hour. I then scooped the flesh out into a bowl and added several (I, uhhh...lost count...hehe) tablespoons of butter, a splash of maple syrup, a pinch each of ground clove and ground nutmeg, and a couple pinches of sea salt. I used a stick blender to combine the ingredients and smooth the consistency of the squash out. The squash puree went into a baking dish and was topped with chopped walnuts, a sprinkle of brown sugar and dots of butter. It was then baked again at 350 for about an hour. All the sides except for the kale were actually made ahead last night and just reheated / baked in the oven while the roast finished cooking, and it worked out really well and saved me a lot of stress today!

We had two desserts today - crustless pumpkin pie and a flourless chocolate cake. The pumpkin pie is super easy - I just mix up normal pumpkin pie filling and dump it straight into a glass pie plate - no greasing, no crust, nada. I bake it at 350 for about 45 minutes, and it always comes out great. I've never had a problem with it sticking in the pan, and I honestly don't miss the pie crust one bit.

The flourless chocolate cake, on the other hand...that was a bit of a project. I actually used this recipe from Epicurious - the name of the cake is "La Bete Noire", which means "The Black Beast". I mean, how could I find a a recipe called The Black Beast and NOT make it, right?! So. The recipe is pretty straight-forward: melt chocolate and butter, beat in some eggs, make a sugar syrup, beat that in, dump into a springform pan and bake in a water bath. Can you see where things might go wrong? Yeah. Springform pan + water bath. I know, I know, people do it all the time and it works just fine....good for them. I followed the directions to a T - wrapped the bottom of the pan in layers and layers of foil, carefully poured the hot water into the roasting pan around the springform pan, etc. I thought it was slightly weird when the springform pan started to float in the water bath, but I saw no leakage / seepage, so I threw the whole thing in the oven for an hour. When I took it out, it was entirely apparent that shit had gone awry. There was a layer of water all over the top of the cake! I let it cool enough that I could pull it out and open the latch on the pan, and all the chocolatey goodness came sliding out in a giant placental sploooosh. Thankfully I had had the presence of mind to open the pan over the sink, or I would likely still be scraping chocolate sludge out from between my floorboards. Anyway - so the first try was a miserable fail. The store was already closed at that point and I didn't have enough chocolate to re-do the cake last night, so I had to wait until this morning to re-stock and try. For the re-try, rather than use a traditional bain marie, I instead took the roasting pan half-full of water and put it on the bottom rack of the oven, then put the springform pan full of cake batter on the TOP rack. An hour later, it was done and beautiful. It did develop a rather large crack across the top as it cooled, but the ganache that I poured over the top filled the crack quite nicely!After the ganache set, the finished product looked like this:

La Bete Noire. La Bete, indeed! 
I got a little over-zealous while mixing the ganache, which is why it ended up with a lot of bubbles, but you know what? Bubbles made of chocolate still taste like chocolate!

This cake is truly ridiculous. It's so incredibly dense and rich. It's like a truffle in cake form. Look at this.

Redonku-chocolate.
 I just followed the recipe and made it plain chocolate (I did add a pinch of salt to both the cake and the ganache because they needed them), but my mom and I spent the whole of dessert talking about different ways you could flavor this thing, and they ALL sounded good. I can't wait to make this again and play with flavorings. I want to get some smaller pans and make mini-cakes though. It's just so dense and rich that there's no way anybody would want to eat more than about a 1/16th wedge of it. My family are hearty eaters and we can put away some serious cake...and we only slayed a quarter of this beast. Whew!

I hope everyone had a great Thanksgiving. I know we did, and with not a trace of wheat gluten in sight.

spinach, sausage and caramelized onion quiche

Pretty much what it says on the tin. I had a pound of sweet Italian pork sausage that needed to be used up ASAP and a package of frozen chopped spinach. I've always got eggs in stock, and usually have an onion hanging around, so this was no sweat to make.

I didn't really measure much - I know I used 6 eggs, probably a cup of cream, just a pinch of nutmeg, a pound of sausage, a medium onion, salt and pepper, some Parmesan cheese and a package of frozen chopped spinach. The sausage was removed from the casings and browned in a pan, then I removed it to my pie plate while I cooked a sliced onion in the accumulated fat in the pan, letting it get nicely browned. The residual sugar from the sausage caramelized the onion well. Onion went into the pie plate with the sausage, then I added the spinach, (which I had cooked in the microwave according to directions on the package and then squeeeeeeezed all the moisture I could out of it). I beat 6 eggs with a little salt and pepper, a pinch of nutmeg and the cream. I grated about half a cup of Parmesan cheese into the eggs, beat well, then dumped it into the pie plate over the sausage, onions and spinach. It went into a 350 degree oven for...I'm not really sure how long, honestly. I just kept checking it to see if the middle was set, and when it was, I took it out and let it cool. It was very yummy!

Monday, November 5, 2012

green meatloaf

We are fans of meat in this house, as I'm sure you've noticed. I'm always interested in finding new and interesting flavor combinations for meatloaf, especially ones that don't require bread crumbs. I've often had good luck using minced mushrooms in place of bread crumbs in my meatloaf mix, and a recipe I recently found on NomNomPaleo incorporating spinach looked really tasty so I figured I'd give it a try.

The problem with me and recipes, however, is that I tend to find them and think "oh boy that looks good, I'll try that!" and then proceed to basically not follow said recipe at all. It kind of sits there off to the side, looking forlornly up at me and trying to catch my attention as I go totally off the rails, usually in the opposite direction. Fortunately, I tend to end up with things that taste good none the less.


So, having made that point, I will tell you the details of my loaf:

I finely chopped three ribs of celery. three smallish carrots, and about a dozen small button mushrooms, and sauteed them with three chopped slices of bacon until the veggies were soft and the mushrooms had released their liquid. Meanwhile, I microwaved a package of frozen spinach until it was thawed but not super hot. I dumped it into a strainer and let it drain, and put about a pound and a half of ground beef into a big bowl. I added onion powder (I didn't have any fresh onions on hand, which is crazy, I know) and garlic powder, some thyme, some chopped parsley, salt, black pepper, and ground mustard. I cracked in a couple eggs, then added the sauteed veg mix and the well-drained spinach that I had squeezed as much liquid as possible out of. I squished it all together with my hands (my favorite part!), formed it into a loaf, and set it on a rack fit inside a lipped cookie sheet. I took a few extra strips of bacon and carefully laid them across the loaf, smoothing them down to wrap the meatloaf. It went into a 350 degree oven for about an hour - I pulled it when the internal temp hit 150 and let it rest for 10 minutes before serving.

Loaf of meat wrapped in bacon? Don't mind if I do!


For a side-dish I did roasted butternut squash, which is super simple. I used to HATE squash of all descriptions because the only way my mom ever made it was pureed and the texture just gagged me (sorry, Mom). When I discovered that many winter squashes could be roasted and would get a little crispy on the outside but stay soft and fluffy on the inside, I was a happy camper. Butternut squash is a good candidate for this treatment - you just have to make sure that a) you toss it in plenty of oil before it goes in the oven and b) you cook it long enough at a hot enough temperature. I did mine on the bottom rack of the oven at 450 degrees for about 35 minutes, flipping all the chunks about halfway through, and it came out perfectly - nice and crisp on the outside, soft inside. I actually dusted the squash with cumin before roasting, which was good, but next time I think I might use garam masala or regular curry powder, even.

Tasty, veggie-laden meatloaf
The addition of the spinach to the meatloaf didn't really effect the taste at all, but it did add extra nutritional goodness. As you can see from the picture, I could have diced my carrots a bit more tidily and smaller, but it tasted good, chunky carrots and all.

Sunday, October 14, 2012

project: pork rib roast

I stopped by the local mom-and-pop grocery store this morning for the same reason I always go there: to see if they had any thick-cut pork chops suitable for stuffing. I could probably just ask the meat counter guy to leave some chops cut really thick for me, but he's never around when I'm there. Anyway - I went in this morning looking for thick chops, and what I found instead was this beauty:

center-cut pork rib roast
That's a center-cut pork rib roast. That's where my favorite thick-cut chops come from. It was close to five pounds, and as soon as I saw it, I knew I had to have it. I thought very briefly about cutting it into chops and stuffing them, but then I decided that since I'd never done a standing rib roast before, I'd make a Sunday afternoon project out of it.

If you Google "standing rib roast", you'll get a lot of pictures that don't look like the piece of meat in the picture above - instead, they have bare bones sticking out the top. This is something that is usually done by the butcher, and it's called "frenching". I'm sure there's some other, more proper name for the procedure, but I don't know what it is, so I'm going to keep calling it "frenching". Also, it's kind of funny to keep saying stuff like "I was frenching my roast", because a) I've been drinking, and b) I'm a 12 year old boy at heart.

Anyway - moving on. Frenching (hee hee) a roast is very simple, but kind of tedious, especially if you haven't sharpened your knives in a really long time like someone writing this blog who shall remain nameless. Ahem. You make a cut along the top of the roast, like so:

About to french the roast. Hee hee. French the roast. 
You cut straight across, right down to the bone. Then, you cut straight down between the end of each rib, like so:

Cut down between each rib bone, then get ready to scrape.
 At this point, you've got a cube of meat on the end of each rib bone. Now comes the tedious part. You take your knife and, cutting and scraping, remove all the meat off the ends of the bones. The roast ends up eventually looking like this - note the little pile of trimmings off to the side there. Don't ditch those - they'll come into play shortly:

Roast: frenched. Hee.
At this point, I preheated my oven to 350, and preheated my cast iron pan at the same time. I scored the layer of fat across the top of the roast, rubbed it with salt and pepper, then began the task of searing the roast. I did each side for about 5 minutes, trying to hold the roast to make sure that all of the fat cap got nicely crisped:

Browning, browning...
Seared off and ready to roast.
The roast then went into my heavy-weight roasting pan. To the pan around the roast, I added some chopped leeks, carrot, celery, all the fat and meat trimmings from the frenching process, and I also dumped in the juices that had built up in the cast-iron pan when I was searing the roast:

Mmm, drippings!
The meat roasted uncovered in a 350 degree oven for about an hour. I took it out when the internal temperature read about 130 degrees. I removed the roast to a plate and tented it with foil, then took the roasting pan with the vegetables in it and set it on a burner over medium heat. I deglazed the pan with some white wine and a little apple cider vinegar:

The sauce cooked down for a few minutes, then I strained the liquid and veggies through a fine-mesh strainer, using a spoon to press the veggies down and really squeeze the flavors out of them.

To carve the roast, I just cut down between the ribs and then gave it kind of a twist at the end to break the bottom bone. I served them with a mix of roasted veggies (I did carrots, red potatoes, parsnips, radishes and Brussels sprouts tossed with some chopped bacon, olive oil, and salt), and spooned some of the pan sauce over the top:

pork dino-chop? Yes please!
The end-result was incredibly moist and tasty, and I was very happy with it. However, I did learn a few things: 1) frenching doesn't really add anything except a fancy-schmancy look, and I don't think I'd bother again unless I was serving to someone I wanted to impress, 2) I need a better way of straining the sauce in order to get more fat out of it. The sauce was tasty, but greasy. I'm sure there's some simple step there that I'm likely missing, and 3) roasted veggies aren't the best side-dish to have with this type of roast, because they need a totally different temperature oven to cook properly. Next time I think I might do greens - something like kale or broccoli raab, maybe. I also think the astringency of the greens would cut the fattiness of the pork nicely.

Sunday, October 7, 2012

curry spiced pumpkin seeds

I bought two pie pumpkins yesterday with the intention of roasting them to make some pumpkin custard. That happened, don't get me wrong...but so did this:

curry-spiced pumpkin seeds
They. Are so. GOOD. I'm finding it impossible to stop eating them. Salty, kind of crunchy, kind of chewy, spicy...so yummy. Loaded with manganese, zinc, and all kinds of other good stuff as well!

These are very easy to make - the hardest part is separating the seeds from the pumpkin guts. Once you get that done, you're home-free! Just toss the seeds with a little olive oil, some sea salt and some curry powder, then spread in a single layer (or as close to it as you can get) on a cookie sheet and roast at 350 degrees for 15-18 minutes, stirring a couple times during the roasting so that the seeds get nicely toasty all over and don't stick to the pan. Once they're done, let them cool a little bit and then go to town. Pumpkin town. Aw yeah.

Sunday, September 30, 2012

clam chowder...sorta

Your basic New England clam chowder is typically made with clams (obviously) and clam juice, salt pork or bacon, celery and potato, some milk, and a roux to thicken it. Since we're gluten-free, thickening with a roux wasn't going to work, and since we try to eat low-carb, loading the chowder up with potatoes wasn't going to work either. I wondered to myself if I could somehow thicken the soup with cauliflower, since it's fairly bland on its own. I've had good luck subbing cauliflower for potatoes, rice, sometimes even pasta ( in the case of my not-mac and cheese). Maybe if I roasted it and then used a stick blender to puree it, I could add it to the soup to give it some body.

I started with chopping a head and a half of cauliflower roughly and then tossing it in olive oil. I added a couple cloves of garlic sliced up, and it went into the oven at 450 for about 30 minutes. In a big pot, I browned some chopped-up bacon, then added some shallots, celery and leeks. I let this all cook down until the vegetables were soft, then added the cauliflower, and some low-sodium chicken stock. I used the stick blender to whiz it all up in the pot, and to my delight, the cauliflower did just what I had hoped it would. It turned into a silky puree that added a wonderful thickness to the soup. With that sorted, I added my seafood.

Now...don't flip out on me, here. I used canned clams. I KNOW. Deep breaths, it's going to be ok. I know that fresh clams would have tasted better and had better texture, but given that I wasn't sure if the cauliflower part was going to work the way I wanted to or not, you can hopefully understand why I didn't want to invest the time and money into getting and prepping fresh clams.

So - into the pot went three cans of clams and their juice, plus some more bottled clam juice. I added a splash of sherry (because, as my ever-wise mother-in-law would say, sherry makes everything better), a couple pinches of sea salt, and about 3/4 of a cup of cream. Because I now subscribe to the "one can never eat too much fish" school of thought, I also added in a pound of cod, cut into bite-sized pieces. I let the whole thing simmer for 10 minutes until the cod was cooked through, then scooped it into some bowls and added a little chopped bacon to the top for crunchy goodness.

Chowdah!
This could have easily gone without the cream, I think. The cream was basically just gilding the lily. Next time I might use half-and-half instead, or even just milk. The cream certainly didn't make it taste bad at all, but it was pretty rich, and we don't really need all that dairy. All in all, though...I was quite happy with how this turned out (aside from the fact that the bacon sunk down into it before I could take a picture).

Sunday, September 16, 2012

how to get your husband to eat seaweed

I've had a bag of dried wakame (seaweed) sitting on my counter for a couple weeks. I bought it because I wanted to start incorporating it into our diet, but I wasn't really sure how. Tonight, as I was roasting some cod and sweet potatoes, I decided to reconstitute a little of the wakame in water to see what it tasted like. When it rehydrated, I realized that it was quite similar in look and texture to kale. It mostly just tasted a little salty. I wondered if I could combine it with kale, saute it with some bacon and onions, and get my husband to eat it. Lo and behold, bacon conquers all and my semi-evil plan worked! Mark didn't say a word about the seaweed as he was eating it, and when I pointed it out afterward, he said that hiding it with bacon was definitely a good idea.

Can YOU spot the seaweed in this picture?!
I know the sweet potatoes look burnt, but they weren't, actually...they were nicely caramelized. I could have done with shaking the pan with a little more frequency for more even browning, though.

The green stuff atop the cod is from this recipe on Nom Nom Paleo (who I love with the firey passion of a thousand suns. Was that weird? Who cares, it's true). It's olive oil infused with anchovies, capers, crushed red pepper, lemon juice and parsley. It was good, but I wish I'd have thought to halve the recipe before I started making it, because it made a lot more than I needed.

So, that's ONE way I can get my husband to eat seaweed, at least!


breakfast of champions

One of my favorite things to have for breakfast is sauteed kale with runny-yolked eggs on top and a drizzle of Sriracha.

Mmmm, buddy.

Friday, August 31, 2012

stuffed pork roast

My original aim last night was to stuff some pork chops, but I couldn't find any pork chops thick enough. I considered trying to take two thinner chops, putting some stuffing between them and then tying them together with cooking twine, but that sounded like a lot of work. Instead, I spotted a boneless pork roast that looked big enough for me to split down the middle and stuff. I was pretty sure that was going to be less work, so I was sold.

The stuffing was simple - chopped mushrooms, onion, parsley, garlic and a splash of sherry, cooked down until soft. While the stuffing cooked, I split the pork roast and pounded it out (gently, I swear!) between two pieces of plastic wrap until it was a relatively even thickness. I laid a few pieces of prosciutto across the inside of the roast, then spread the stuffing over it. I sprinkled some feta cheese over the whole thing and then carefully rolled the roast up as tightly as I could. I tied it closed with three pieces of string and liberally salted and peppered the whole thing. I then seared each side for a few minutes apiece in my cast-iron pan while I preheated the oven to 450 degrees. When the roast was nicely browned on the outside, I covered the whole pan with foil and popped it into the oven for about 20 minutes. Once the roast hit 140 degrees, I pulled it out and set it on a plate and let it rest for about 10 minutes, then sliced it and served it over some Parmesan-sprinkled steamed spinach. Don't worry, it looks quite a bit more pink in the picture than it actually was in real life.

Stuffed Pork Roast
This was very tasty, and relatively easy. The main issue was getting the roast pounded to a consistent thickness and making sure I didn't OVER-stuff it. Over-stuffing leads to the good stuff falling out in the pan, and that's no fun at all. Also, this is pretty cost-effective if you happen to hit a good sale on boneless pork roast like I did.

Wednesday, August 29, 2012

surf & turf with chimichurri

Chimichurri is a salsa (a sauce) originally from Argentina, and is used widely in South America on grilled meats. It consists of different things depending on the region and the cook, but the most basic version is a mixture of fresh parsley, cilantro, green onion, olive oil, vinegar, and garlic.

I had some salmon I wanted to cook, and some leftover sirloin steak tips from the night before, so I figured I'd try to combine them for a bit of a surf & turf. I seared the salmon in my cast iron pan in some melted bacon fat - it took about 5 minutes per side because the filets were quite thick. This was actually my first time doing salmon in the frying pan, and I'm a convert. The skin comes out so wonderfully crispy...yum! My steak tips were already cooked from the night before, so I just threw them in the still-hot pan with the fish and let them warm through.

The sauce itself is ridiculously easy....if you have a blender or food processor that works. I found out the hard way that my blender doesn't like to whiz up parsley, so I had to scoop everything out onto a chopping board and go at it the old-fashioned way with a big knife. It was good for stress relief, at the very least!

When the sauce was done, I plated everything up and spooned it over the salmon:

It was a very yummy combination. The acid and herbal brightness of the chimichurri cuts through the fattiness of the salmon very nicely Even my husband, who is not generally a fan of salmon, said he liked it and would eat it again, so we'll add this one to the repertoire. :)

Here's a quick listing of what I put in the chimichurri - you can just chuck it all in a food processor or (dependable) blender, or chop it by hand, or even mortar-and-pestle it if you want to go really old-school:

1 1/2 cups fresh parsley
1/2 cup fresh cilantro
3 green onions, chopped
2 cloves of garlic
3 tbsp extra-virgin olive oil
3 tbsp red wine vinegar
pinch of salt
pinch of black pepper

Saturday, August 25, 2012

shrimp and mussel thai red curry

My husband asked for shrimp curry for dinner the other night, but we ended up going out instead. Never one to forgo a chance to make curry, I acted on the request last night instead! Hubs likes shrimp, he likes curry, but he'd never had mussels (or any shellfish at all, it seems - no clams, no oysters...bwuh?!). I had been wanting to do some curried mussels for a while anyway, so I made him a deal - I'd make the shrimp curry and cook the mussels separate and then he could try one and see if he liked them. If he did, I'd add them into the curry. If not, well...more mussels for me.

The thing I DIDN'T tell him (sorry sweetie, if you're reading this) was that he was going to get a dose of mussel goodness either way, because my plan was to steam the mussels and then use the steaming liquid as the base for my curry. I sauteed some shallot and garlic in a big pot in some coconut oil while I cleaned and de-bearded the mussels, then added some white wine and some water (I had less wine than I'd thought...a common problem at my house. Ahem.) to the pot and dumped the mussels in. They steamed for about 5 minutes while I shelled my defrosted shrimp. I then scooped the mussels out, ate a few because I can't help myself, and set the bowl aside. I checked to make sure the cooking liquid didn't need to be strained, but this batch of mussels was very clean and not gritty in the least. I added a can of coconut milk, a couple tablespoons of red curry paste, a few good sloshes of fish sauce and a little more water, then mixed it all up well. I had pre-cooked some cauliflower by steaming it in the microwave for a few minutes (because Impatience is my middle name and I didn't want to dick around waiting for the cauliflower to soften in the broth, which takes like 20 minutes), so I threw that into the pot, added some sliced mushrooms, and turned the heat up to get a good simmer going. Once the liquid was simmering, in went the shrimp. Because shrimp cook so quickly, I actually shut the heat right off as soon as I added them into the pot...there was more than enough retained heat to cook them through.

It was then make-or-break time. I took a spoonful of the curry broth, placed a nice fat mussel on it, and took it over to my husband. He looked at it a bit warily, and which point I said, "you said you would try it!". He gave a bit of a resigned sigh and popped it into his mouth. He declared it "ok". I asked if he wanted some of the mussels in his bowl of curry, and he said "sure, if you de-shell them for me". So, I took a few minutes to shuck the mussels out of their shells, threw them into the pot, gave everything a good stir, and we were ready to eat:

Thai red curry shrimp and mussels
I had to go a little easy on the curry paste because this batch seemed quite a lot hotter than the last few batches I've gotten, and Hubs can't do really spicy food. So that's why the sauce is pretty light-colored. Also, I forgot the basil AGAIN. I don't know what it is with me forgetting basil, but pretty much anything I make that requires it ends up with me trudging back to the store to get it because I've forgotten it. Or just skipping it, in last night's case.

This was pretty yummy, but a little too coconut-tastic for me this time. Next time, I want to try the shrimp and mussels together in a tomato-based tikka masala type sauce.

Wednesday, August 8, 2012

roasted cod with olive tomato tapenade

I've made this Eating Well recipe a few times, and it's fantastic. Fish and tapenade might sound like sort of an odd combination at first, but cod can certainly stand up to the strong flavors of olive and capers. The original recipe suggested orzo and sauteed spinach to serve with it. As orzo is just pasta, I skip that part. I serve the fish and tapenade on a bed of steamed spinach and it works very well.

Definitely give this recipe a try!


Friday, July 27, 2012

kale and seafood soup

The funny thing about this is that I did everything completely wrong and backwards, but in the end it tasted pretty good. I actually started by steaming some mussels in white wine and butter with onion and garlic. When they were done, I removed them from the liquid and then used the cooking liquid as the base for the soup. I chopped up some linguica sausage and added it, along with some chicken stock. I chopped up some kale pretty finely and added that, then let it cook for 5-7 minutes. In went some shrimp and some chopped-up cod, a splash of sherry and a little salt and pepper. I let it cook for about 5 more minutes, until the fish was cooked through.


Wait, you're saying...what happened to the mussels? Funny thing about that, actually. I kept picking at them as I was cooking everything else, because they were sitting right there in front of me and I was hungry. By the time I got to the end of the soup-making, they were gone. It's ok, though...they gave the stock plenty of their tasty goodness, and they made an excellent snack!


beef and broccoli

Pretty much what it says on the tin. I had some chuck steak to use up and a craving for Chinese. I cut the steak up and marinated it in a mixture of tamari, ginger, garlic, and a splash of sherry. While the meat marinated, I sliced up some white button mushrooms, some white onion, and cut up some broccoli florets. I stir-fried the veggies in some coconut oil first, then dumped them into a bowl (it was truly an unceremonious dumping, I promise you) and stir-fried the meat. When the meat was almost done, I added a cup of beef broth with a tablespoon of corn starch stirred in, and let that come to a boil. I added the veggies back in and tossed everything well to coat, then it was done! And tasty!


Thursday, July 19, 2012

eat more fish

I'm making it my mission to eat more fish. Fish is what we evolved eating, and it's what our bodies and especially our brains need to run effectively. Fish is like jet fuel for your brain. A serving of fish a day can lower blood pressure, improve your resting heart rate, lower cholesterol and triglycerides, improve your insulin sensitivity, and on and on. Seriously. Start eating more fish...your life will be better for it!

The fish of choice tonight was cod. I was wandering around the produce aisle, wondering what I'd have with said cod, when something slightly alien-looking caught my eye. Broccoli rabe! I almost never see it available at my local grocery store, so I snapped a bunch up. Never mind that I'd never actually cooked it or even tasted it before. When has that ever deterred me?! I knew it was meant to be fairly bitter, but that was about it. I put it in my basket anyway, thinking to myself  "this is what Google is for, clearly".

Turns out one of the traditional Italian ways to cook broccoli rabe is to blanch it in some boiling water, and then sautee it in some olive oil and garlic until it's tender. Well that was certainly do-able! I gave it all a good rinse, then cut off the tough ends of the stalks. In retrospect, I should have cut more off, but now I know for next time. I dunked it all into a pot of boiling water for about 5 minutes, then drained it. I added some olive oil and sliced garlic to the pan and let it warm up, then added the rabe and gave it a few good tosses before shutting the heat off.

Before tackling the rabe project, I had preheated the oven to 425. I cut up about 1 3/4 pounds of cod filets, placed them on a baking sheet lined with parchment, and drizzled them with olive oil. A little black pepper completed the picture, and into the oven they went, for about 12 minutes (as the pieces were pretty thick. I checked at 10 minutes and they weren't quite done). I scrubbed and cut in half a sweet potato and put it in the microwave for about 8 minutes while everything was cooking, as well. Everything basically got done at the same time - fish came out, greens were wilted, sweet potato got scooped out of the skin and mashed up with a little Kerrygold butter (it's made from milk from grassfed Irish cows. Very tasty, and super good for you too) and a touch of salt. I also added a touch of salt to the greens, plated everything up, and it was time to eat!

Cod, sweet potato, garlicky broccoli rabe
The rabe and sweet potato actually made really nice counterpoints for each other - sweet, rich and velvety potato against bright, nutty, slightly bitter, almost floral-tasting rabe...and all against a background of tender, juicy fish. YUM!

So there you go. Fish can be quick and easy, and it's super good for you. EAT MORE FISH!

spanish-style chorizo and shrimp

Monday afternoon at work, I was trawling on Ravelry during my lunch break, as I am often wont to do. Someone had posted a thread asking what to do with Mexican chorizo for dinner. I suggested chorizo, kale and runny-yolked eggs, because that dish makes my heart go pitter-pat...but it also got me thinking about chorizo. Pretty much all afternoon, I was dreaming of it - fried, scrambled with eggs, in tacos, in soup...you name it, I probably thought about eating it. Unfortunately, my local grocery store only has the Spanish / Portuguese style of chorizo, not the Mexican kind....but the more I contemplated, the more I decided I wanted chorizo enough that I could make due with the cured Spanish kind.

Toward the end of the afternoon, an idea struck me: I bet chorizo would be good with shrimp! A little Googling brought me round to this recipe. I ended up following it pretty much to the T, except that I only put in half the salt it called for, and instead of serving tapas-sized portions with bread, I loaded plates up with sauteed spinach and served big portions.

This came out really well, and I'd absolutely make it again, though I WILL say: I only used half of the salt the recipe called for and it was still VERY salty. I would knock the salt back even further next time, for sure.

Shrimp and chorizo sausage

Sunday, July 8, 2012

mussels

I had a hankering for mussels, and there were some nice-looking ones at the grocery store tonight. I brought them home, trimmed the "beards" off, gave them a good bath and scrub in cold water, and then set them to steam in a bit of chardonnay laced with olive oil and garlic. When the mussels were done (about 8 minutes), I scooped them out with a slotted spoon and set them aside while I reduced the cooking liquid and then added some butter and black pepper to it. I ran the sauce through a strainer into a little bowl, then sat back and happily nommed on mussels dipped in butter sauce. If you were a pasta person, you could pick all the mussels out of the shells and toss them with the sauce in some linguine...but I liked them just fine plain, with a nice cold beer. The only thing better would have been eating them on the beach up in Maine with my toes in the sand.

Maine wild-caught mussels with butter sauce

every day I'm trifle-in'

Not every day at all, actually...more like once a year. Making trifle for the 4th of July has apparently become a tradition for me. Everyone in my family really likes it, and I enjoy making it, so it's just kind of an automatic for the big family get-together on the 4th, now.

This year, I couldn't decide whether to do blueberry and lemon or strawberry rhubarb, so I did both - one in each layer - and it was awesome. I will admit, the finished product wasn't exactly pretty. I didn't have the patience to be meticulous with my layers and so it started to look kind of like a tie-dye session gone awry, but sweet monkey overlords, was it tasty!

Trifle 


The only part of this trifle that wasn't home-made was the anglefood cake, because it was WAY too hot to bake a cake. The blueberry layer was made from local blueberries, a little sugar, a little butter, some corn starch and the juice of a lemon. The custard was made from scratch as well - no Jell-O boxed mixes, thank you! It was made of eggs and cream both from a local farm, and a bit of sugar and vanilla. The strawberry layer was made from strawberries from the farm just up the road, rhubarb from my dad's garden, and a bit of sugar. The top layer is, of course, more cream, whipped with just a tiny bit of sugar. I'd have soaked the cake with sherry as an homage to my Welsh mother-in-law, but I didn't make it to the liquor store in time and thus was sherry-less (the SHAME, I KNOW!).

Next year I think I'd like to try making my own sponge cake rather than using a store-bought angelfood cake. The anglefood cake works fine, but it's just...I don't know. It just doesn't quite GO with the rest of it somehow, if you see what I mean.

Also, for any of my Paleo-diet friends or low-carb'ers reading this, no...this is clearly not compliant. Holidays happen. :)

Wednesday, June 27, 2012

crispy salmon cakes with lemony yogurt sauce

Something I've been interested in trying to make for a while now is salmon cakes. Traditionally they have mayonnaise and often bread crumbs incorporated into them. I wanted to see if I could make them without either one of those things. I came across this recipe on Epicurious which sounded quite nice, so I figured I'd tweak it a little and give it a try.

The recipe calls for pitas or bread. Obviously, that had to go. I also ixnayed the mayo that the recipe called for. Instead of bread, I added a 1/4 cup of gluten-free baking mix (I like King Arthur Flour brand). I mixed everything else up the same as the recipe, and it didn't seem too dry in the least, so I just skipped the mayo altogether. I formed the mixture into patties and fried them in a little bit of coconut oil, about four minutes per side. The cakes crisped up nicely, but stayed very moist inside. When they were done, I mixed up the yogurt sauce and spooned it over the top, and served with some quickly-steamed asparagus. The sauce was good not only on the cakes, but on the asparagus as well.

Next time, I think I might go for less lemon in the cake itself. I think would also be quite good done in a ginger-garlic-sesame direction rather than lemon and chive.

Crispy Salmon Cakes with Lemony Yogurt Sauce

Thursday, May 31, 2012

mince curry

During a recent discussion with several online friends about various uses for ground beef, a small revelation was handed down to me: mince curry. ("Mince" is a general term for ground meat - you can have lamb mince, pork mince, etc.) I had never even considered making curry with ground beef until one of said online friends mentioned that her South African step-dad made a really nice mince curry, and then described the general recipe. I drooled a bit reading it, and vowed that I would some day try making it, if my apartment ever came down to a reasonable temperature again.


Today happened to turn out fairly nice and cool (compared to the last few days, anyway), so I decided I'd give the mince curry idea a try.

Mince curry!
Now, I know it doesn't look like much in the picture. Curries don't tend to be particularly pretty affairs, in my opinion. But let me tell you...this stuff? Heaven in a bowl. Maybe it was because I was really hungry. Maybe it was just a good day for curry, I don't know...but honestly, this tasted SO GOOD. I'm a mince curry convert for sure. 

Traditionally, this dish should have peas and potatoes in it, but since I'm not a huge pea fan and I don't eat many potatoes, I nixed them both in favor of cauliflower...but you could easily add them (and whatever other veg you want) back in. Also, if you have a while to cook and you want a richer sauce, you can add the ground beef raw and let it cook right in the sauce - it would probably take 40 minutes or so. I didn't want to wait that long, and since 80/20 was the leanest ground beef I could find at the time and I didn't really want my sauce inundated with fat run-off, I chose to brown my beef beforehand and then chuck it in later.

Mince (Ground Beef) Curry

1 lb ground beef (I used 80% lean), browned
1 head cauliflower, washed, trimmed and cut into bite-sized pieces
1 can coconut milk
1 sm. can tomato paste
1 cup water
1 large white onion, chopped
2 tbsp garam masala
3 cloves of garlic, minced or grated
2.5" worth of fresh ginger, minced or grated
1 tablespoon butter or coconut oil

Melt butter or coconut oil in large pan. Add chopped onion and cook over medium heat, stirring frequently, until onion is soft and somewhat golden. Add garlic, ginger, garam masala and tomato paste. Stir and cook until fragrant - 1-2 minutes. Add coconut milk and water, stir to incorporate. Add cauliflower and browned ground beef, stir well. Cover and allow to cook on medium-low until cauliflower is tender, about 10 - 12  minutes. Serve.


Friday, April 20, 2012

chicken piccata

Pretty much what it says on the tin:

As you can see, I over-parsley'ed the sauce a bit, but it was none the worse for wear from it. I was being lazy and just rough chopped the parsley rather than mincing it. It's Friday, sue me.

Chicken piccata is dead easy to make - just split a couple chicken breasts into cutlets (you can pound them thin if you want, but I didn't bother and it came out just fine), brown them up in some butter and oil, then add some more butter, wine, lemon juice, parsley and capers to the pan to make a sauce, and you're ready to roll! It seriously takes longer to prep everything than it does to cook it. I paired the piccata with asparagus because it's in season, and because asparagus plays nicely with the flavors of white wine and lemon. It worked out very nicely.

Chicken Piccata
(serves 3 hungry adults)

3 boneless skinless chicken breast halves, split horizontally into cutlets
3 tablespoons unsalted butter
1 tablespoon olive oil (regular - don't use extra virgin)
4 tablespoons dry white wine (I used chardonnay)
2 tablespoons jarred capers, drained, rinsed well and chopped
1/2 a cup (or so...haha) minced parsley
2 bunches of small-diameter asparagus (mine was mostly pencil-sized), steamed to your liking

Split the chicken breasts horizontally into cutlets and lightly season with salt and pepper. In a heavy skillet over medium-high heat, heat oil and 1 tablespoon of butter until butter stops foaming. Carefully add chicken to pan. Cook, working in batches if necessary, for 1-2 minutes per side until just cooked through. Remove chicken to platter (I put mine in a preheated 200 degree oven with foil over while I finished the rest of the chicken and made the sauce). Pour fat out of skillet, then add the remaining 2 tablespoons of butter, the wine and the lemon juice. Let come to a boil, stirring to loosen brown bits from bottom of pan. Stir in the capers, parsley, and salt and pepper to taste, and remove from heat. Serve chicken over bed of steamed asparagus, with sauce spooned over.

If you're a starch eater, this would be good with pasta, rice pilaf, or even some garlicky mashed potatoes.

Tuesday, April 10, 2012

thai red curry fish stew

I was thinking about dinner on the way home tonight (as usual), and trying to think up a way to use leftover chicken thighs. Somehow, stir-fried chicken thighs morphed into chicken curry, which morphed further into thai red curry with shrimp.

Shut up, I'm complicated.

By the time I got to the grocery store, I had a plan. I was going for shrimp, and mussels if I could find them. If not, I was going to try fish. The idea of fish curry scared the crap out of me. I've had it before and I knew I liked it, but I'm not generally super good at cooking fish and the idea of it just makes me nervous.

Lo and behold, there were no mussels at the store, so I grabbed a bag of shrimp and lovely big cod fillet, along with some zucchini and cauliflower, coconut milk and red curry paste. When I got home, I thawed the shrimp under cold running water while I sauteed some chopped onion in coconut oil and red curry paste. I added the coconut milk, some fish sauce, chopped zucchini and cauliflower, unsweetened shredded coconut, and some water and let it all simmer for about 10 minutes. When the veggies were basically tender, I added the shrimp and chopped-up cod and let the whole thing fester for about 5 more minutes, then shut the heat off. I scooped some into a bowl and added a bit of fresh basil.

Here are the fruits of frankly not a whole lot of labor on my part:


It was everything I was hoping for. The only criticism I have is that I should have had two cans of coconut milk rather than just one, because more sauce is better!

Sunday, April 8, 2012

Easter dinner

We didn't do much for Easter this year because my husband had to work early in the morning, but I did manage to pick up a small boneless ham and some veggies for roasting, all of which came out quite well.

I had a couple pieces of prosciutto left over from the pork chop project the other night, so I got all fancy and made asparagus bundles wrapped in prosciutto, with a bit of Parmesan on to. The cheese doesn't look very toasty in the picture, but it actually crisped up nicely. The veggies are my usual potato / carrot / radish / onion / Brussels sprouts with a bit of bacon added. So, all in all, we had a pretty pork-tastic Easter!

Wednesday, April 4, 2012

prosciutto mushroom stuffed pork chops

As many of my cooking stories begin, so does this one - trawling through the meat department at the grocery store. I encountered a pair of nearly-two-inch-thick boneless pork chops that just begged to be stuffed, so home with me they came! Here's what I did with them:

The stuffing is a quick and simple combination of minced onion, white mushrooms, garlic and thyme, sauteed in a little butter. I cut a deep pocket into each chop, laid a piece of prosciutto into each one along with a piece of fontina cheese, then stuffed the mushroom mixture in. I pan-seared the chops for 2 minutes per side, then put them on a pre-heated pan in a 450 degree oven. The chops baked for 10 minutes while I steamed some asparagus, then it was time to eat.

As you can see, my stuffing started to fall out as I was taking pictures. I usually tie meat up with kitchen twine when I've stuffed it, but I didn't bother this time...and I re-learned my lesson! Other than the stuffing falling out, these came out quite well. I really like fontina cheese - it melts so smoothly, and it has a really nice nutty flavor that, in this dish, mixed nicely with the sweetness of the onions and the saltiness of the prosciutto.

Tuesday, March 27, 2012

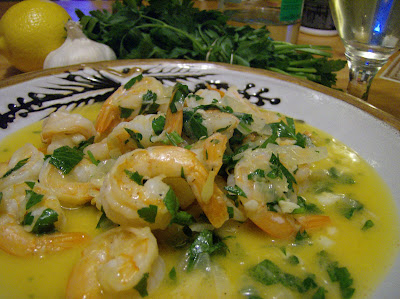
shrimp scampi

Today I was sitting at work when a deep longing for shrimp came over me. Over the course of the day, I dreamt of tempura shrimp, cioppino loaded with shrimp, even shrimp cocktail. My brain would NOT let go of shrimp. Toward the end of the day, after much Googling of cioppino recipes and consulting of the budget, it was clear that I was NOT going to be making any lovely mixed seafood stew for dinner tonight. I did, however, happen to have two bags of frozen shrimp in my freezer, so all was not lost!

I contemplated green curry for a while, but it just wasn't quite what I wanted. Dreaming of shrimp, I went on with my work day. Towards the end of the afternoon, it hit me: scampi. Garlicky, buttery, lemony, winey, shrimpy scampi. After that revelation, itt was on like Donkey Kong. I was on a mission.


On the way home, I stopped to pick up the few items I did not already have in the house for scampi - a bottle of white wine, some fresh parsley, and some lemons. When I got home, I defrosted the shrimp under some cold running water and peeled them (because apparently my idea of "peeled and deveined" is different than the shrimp manufacturer's...), then left them to dry on some paper towels while I finely chopped a small yellow onion and six cloves of garlic. Yes, six. Some of them were small. And I really like garlic.

When things were chopped and ready to roll, I put 4 TBSP of unsalted butter (I use Kerrygold Irish butter. It's wonderful and well worth the extra money) and 2 TBSP of coconut oil in a large pan over medium heat. Yes, I realize most recipes call for olive oil, but I like coconut oil better.

Once the butter had melted and stopped foaming, I added the chopped onion and garlic. Things went pretty quick from here on out - the onion and garlic only cook for a couple minutes, until the onion starts to become translucent. Then, the shrimp go in and get stirred around pretty frequently until they're about halfway cooked, which only takes 2-3 minutes. Then the wine goes in - I used pinot grigio but chardonnay would also be yummy. I used about half a cup. The juice of two lemons also went in. To that, I added a little salt and black pepper and just the scantest bit of cayenne pepper (which you can totally omit if you don't want any bite). I turned the heat down to low and let everything cook together for 2-3 minutes more, until the shrimp were fully cooked. I then killed the heat, chopped up some fresh parsley, gave it all a good toss, and plated it up:


Yes, I realize that scampi is usually served over pasta or rice - something to soak up the fabulous sauce. I don't eat pasta or rice anymore, so I just skipped that part. And you know what? The sauce tastes just as good when you're slurping it up off the plate by itself as it does when you're slurping it up with pasta. When you tip the plate up to your mouth to get the last dregs of sauce, you know it's good! Next time, I think I WILL roast up a spaghetti squash to have with this simply because the shrimp would go a lot further with a filler like that...but for tonight, I shall revel in the decadence of straight-up shrimp in garlicky winey lemony butter sauce. Aww, yeah.


Sunday, March 11, 2012

rogan josh

By now I'm sure you're all well aware of my fondness for all things curry. Mmmm, curry! Curry is not exactly a popular thing in Vermont, at least not in the part I live in. Every town around here has two or three pizza joints, and probably every town (on average, at least) has an Americanized-Chinese restaurant, but any other kind of ethnic food is pretty under-represented. We do have two Indian restaurants "near by" - meaning 30+ minutes' drive away - which means we never go to them.

Instead, I've learned to make my own curry and it's been a rewarding adventure. My first stab at curry was a couple years ago when my (then newly installed) UK-born husband started jonesing for the unofficial UK national dish, Chicken Tikka Masala. I'd never made anything so exotic as curry before, and I was a little nervous as I researched recipes and went shopping for ingredients. However, never one to back down from a cooking challenge, I gave it a go. It turned out yummy, and my husband's high praise gave me the confidence to try other types of curries. I've even converted my "what's in it, is it weird, what does it taste like, I don't know about this" parents into curry fans.

When I got "Well Fed", a Paleo-diet cookbook by Melissa Joulwan, I wasn't sure what to expect - especially after a couple of other sort of disappointing Primal- and Paleo-compliant cookbooks I'd recently bought. "Well Fed" was a pleasant surprise, full of  awesome photos, yummy-sounding recipes, and just the general way the book was put together. One of the recipes that really caught my eye was one for Rogan Josh, which I'd been recently thinking about trying to make. Huzzah! Happy coincidence! I bookmarked the recipe and, a couple weeks later, decided to give it a go.

Obviously I can't type the whole recipe out for you here because that's not cool (buy the book! Seriously! Worth the money!), but I can tell you that the meat is browned on its own (the recipe calls for lamb, but I used beef), and then has a nice long simmer with plenty of onions in a sauce made of cumin, coriander, cinnamon, ginger, and some other spices, along with coconut milk. The resultant texture is silky and lush. We had it spooned over some steamed cauliflower for dinner, and then we ate bowls of it like stew the next day for lunch. It's one of those dishes that improves with an overnight sit in the fridge, too. I'll definitely be adding this to my list of curry can-do's!


Tuesday, February 28, 2012

brussels sprouts with bacon

Yes, I've expounded upon the awesomeness of Brussels sprouts roasted with bacon before, but it's something that bears repeating.

Seriously. They're so freaking good, and they only take 20 minutes. I could eat them every day.

Friday, February 24, 2012

slow-cooker pulled pork carnitas

Carnitas are usually made of pork that has been cut into chunks and slow-cooked in fat, then crisped up before serving. Since I usually have to spend eight hours a day at a place called "work" and I don't have three hours AFTER work to wait for dinner, I decided I wanted to try doing a slow-cooker version of carnitas instead.

Part of what makes carnitas so good is the crispy rendered bits of meat. When you're cooking a pork butt in a crockpot, you don't get those bits. I came up with two ways to deal with this, each of which was only moderately successful on its own, but done in conjunction seemed to really make a difference. The first thing I did was brown the entire roast, one side at a time, in a very hot pan. This ensured that I'd at the very least not end up with flabby chunks of fat in the crock-pot at the end of 10 hours of cooking. It also, I think anyway, made the flavor of the meat deeper than just plopping it in the slow-cooker would have. The second thing I did was, after shredding the cooked meat, I spread it out in a wide, shallow pan and chucked it into a 450 degree oven for 10 minutes. The top surface of the meat got nicely crisp and did a good job of emulating the crispy bits of traditional carnitas.

I used Bibb lettuce leaves to pile the meat and toppings on rather than tortillas. As you can see, I went for avocado, cilantro, radish, white onions, and there's actually some salsa, lime juice and full-fat Greek yogurt in there, too. Some people look askance at me for putting radish on my tacos like this, but I really like the crunch of them, especially with all the softness of the meat and the avocado.

I'm fairly happy with how these came out, but I'll definitely try them again with the addition of some citrus juice and spices to the cooking liquid. This time around, I just used a little chicken stock, a bunch of minced garlic, salt, pepper and oregano. I did mix some onion powder and and cumin into the meat as I was shredding it as well, but next time I'll definitely add these at the beginning of cooking so to better infuse the meat with flavor.

Sunday, February 19, 2012

salmon en papillote

In an attempt to be more healthy last weekend, I decided we need to eat more fish. I bought a bag of frozen wild-caught salmon fillets at the grocery store and chucked them in the freezer. Yesterday afternoon, whilst peering into the depths of the freezer and thinking about what to make for dinner, the bag of salmon caught my eye. It was honestly less of a burning desire to eat the fish and more of a guilt thing over having spent money on it but not used it that made me pull two fillets out of it...but the point is that I DID pull two fillets out, defrosted them, and cooked them for dinner.

I wanted to jazz the salmon up a little, since frankly neither my husband nor I tend to get too excited about fish unless it's beer-battered and served with a heap of fries and malt vinegar. Flipping through several cookbooks yielded little inspiration - everything seemed to be calling for sugary glazes to coat the salmon with, and we're doing our best to cut sugar out of our diets. I remembered an episode of Good Eats I saw years ago, where Alton Brown cooked salmon in these nifty parchment pocket things - you pack the fish and whatever else you want to go with it into a parchment pocket, seal it up, cook it, and everything lightly cooks itself in the trapped steam. It sounded like the beginnings of a good idea, so I turned to trusty Google and found an old Julia Child recipe for Salmon en Papillote with Tomatoes and Shallots. Winner, winner, fish for dinner!

The recipe, found below, is super simple as long as you can get your hands on some parchment paper. All you really need to do is season the fillets and then place them on the parchment with your chosen vegetable accoutrements, like so:


Then, you do a little origami practice to seal the packets up, like so:


 NOTE: Gods, how I tried to do these packets into nice neat rectangles by folding the ends of the parchment over in the middle and then creasing the ends closed, but they WOULD NOT stay closed no matter what I did, so I regrouped and did it Alton Brown's way. Worked so much easier. I wish I'd have just done it that way to begin with, as it would have saved me a good 20 minutes of paper-crackling and swearing and muttering about having quit drinking too soon.

These packets then go into a 425 degree oven for about 8 minutes or so. The only thing I found frustrating about this cooking method (other than the above-mentioned packet-making debacle), was that when it came time to check the fish to see if it was done...I couldn't, at least not without ripping open one of my carefully constructed packets. That was mildly annoying. I cracked one open and deemed it done, but if it hadn't been, I suppose I'd have had to just stick them back in the open ripped open and hope for the best.

Anyway, this was the end result:

It was pretty tasty, though I'd like to try the same recipe again with fresh fillets rather than previously-frozen ones. I think, with salmon at least, freezing just does something unfixable to the texture of the fish. I enjoy fresh a whole lot more than frozen, but this was still certainly decent. As you can see, I added some asparagus and a side-salad with a nice bright lemon-garlic dressing.


Salmon En Papillote with Tomatoes, Shallots and Asparagus
Serves two

1 medium bunch of asparagus (or about 6-8 spears per person, depending on how much you like asparagus), woody ends broken off
2 Roma tomatoes, washed and chopped
1 large or 2 small shallots, chopped fine
2 4oz salmon fillets, fresh or defrosted
salt and pepper
small amount of butter for applying to parchment and topping vegetables
parchment paper

1. Pre-heat oven to 425 degrees. Season salmon fillets with salt and pepper. Rip off a piece of parchment about 16" long. Lightly rub center of parchment with a bit of butter. Arrange half of asparagus on parchment. Place one salmon fillet atop asparagus. Add half of chopped tomatoes and half of chopped shallots atop salmon fillet. Top with a dab of butter.

2. Carefully fold parchment over fish and vegetables and work your way around the edge, folding paper over and crimping as you go.When you get to the other corner of the packet, crease the paper and fold the remainder UNDER the packet. This will keep it closed and keep the packet air-tight.

3. Repeat with remaining ingredients.

4. Place packets on a cookie sheet and place in 425 degree oven for about 8 minutes (my fillets were about 3/4 inch thick. If you have thicker ones, you'll need to adjust your cook time up by a couple minutes).

5. Remove packets from oven, open carefully, and serve.

Note: If you're interested, the dressing on my salad was a vinaigrette made with the juice and zest of one Meyer lemon, some extra virgin olive oil, a small dash of white wine vinegar, a little salt, and one clove of garlic, minced.

Friday, February 17, 2012

chicken curry with cauliflower "rice"


This is SO good, and it's super easy, trust me. This dish took me 30 minutes, start to finish, and that was with nothing prepped ahead of time (because, frankly, that's usually how I roll). Lightly mashed cauliflower actually makes a really nice rice substitute, and it's really not much more work than actual rice. The key is to get the cauliflower going before you do anything else, because it takes the longest to cook.

See? Looks like rice!


Chicken Curry with Cauliflower "Rice"
6-8 servings

1 large head cauliflower
1 can coconut milk
2lbs boneless skinless chicken thighs
1 tsp coconut or olive oil
1 large onion, chopped
4 cloves garlic, grated or minced
2 tablespoons ginger, grated or minced
1 tablespoon garam masala
1 28oz can diced tomatoes (I use the no-salt-added organic ones)


1. Put a large pot of water to boil on high heat. Add a pinch of sea salt. While waiting for water to heat, trim and rinse cauliflower, and chop roughly. It doesn't need to be chopped fine, just chunk it up into pieces that are all roughly the same size. Put chopped cauliflower into boiling water, turn heat down to medium, cover. Allow to boil for around 10 minutes. You want it fork-tender, not mushy. Alternatively, you could steam the cauliflower if you've got the set-up for it.

2. Heat a large pan over medium-high heat and add olive or coconut oil. Working in batches, sear chicken thighs for about 2 minutes per side, then remove to a plate and set aside. Don't worry, the chicken will finish cooking in the sauce in a few minutes.

3. Once chicken has been seared, add chopped onion to pan. Cook, stirring frequently, until onion becomes golden. Add in garlic, ginger and garam masala, stir well to coat. Cook this for about a minute, or until the spices become fragrant.

4. Add chopped tomatoes and coconut milk, stir well to combine. Roughly chop up the chicken thighs into 1"-ish pieces and add to sauce. Stir, then turn heat to medium-low and allow to simmer while you prepare cauliflower.

5. Carefully drain cauliflower and return to pot. Mash into small bit - I use a standard-issue potato masher for this. Just remember that you want a rice-like consistency. You'll know it when you see it:

6. When the chicken has no visible pink left, the sauce is done. Scoop some cauliflower "rice" into a bowl, spoon some sauce and chicken chunks over it, and enjoy!

So there you go. Flavorful chicken curry that's quick, easy, pretty cheap, low-carb, and really very tasty.

Wednesday, February 15, 2012

pork chops with dijon pan sauce

Nothing too ambitious tonight, really...especially after the fancy-pants dinner we went out for last night! I had some boneless pork chops defrosted that I needed to use up, but I really wasn't in the mood for a stir-fry, so I decided I'd pan-sear the chops and make a little sauce to go with them. This is what I came up with!
It may not be much to look at, but this was actually very tasty. I started by heating up some olive oil and searing off my chops, then removed the chops from the pan and deglazed with about a cup of chardonnay. I added two large chopped shallots, a tablespoon of butter and a tablespoon of dijon mustard, then gave it a good whisk to make sure all the good bits got scraped up off the bottom of the pan and everything got combined well. I turned the heat down to low and added the chops back to the pan along with their accumulated juices. I let them cook on low for about 6 more minutes while I quickly steamed some broccoli. The chops then came out of the pan and the sauce was spooned over, and voila! Quick, easy, healthy dinner.